
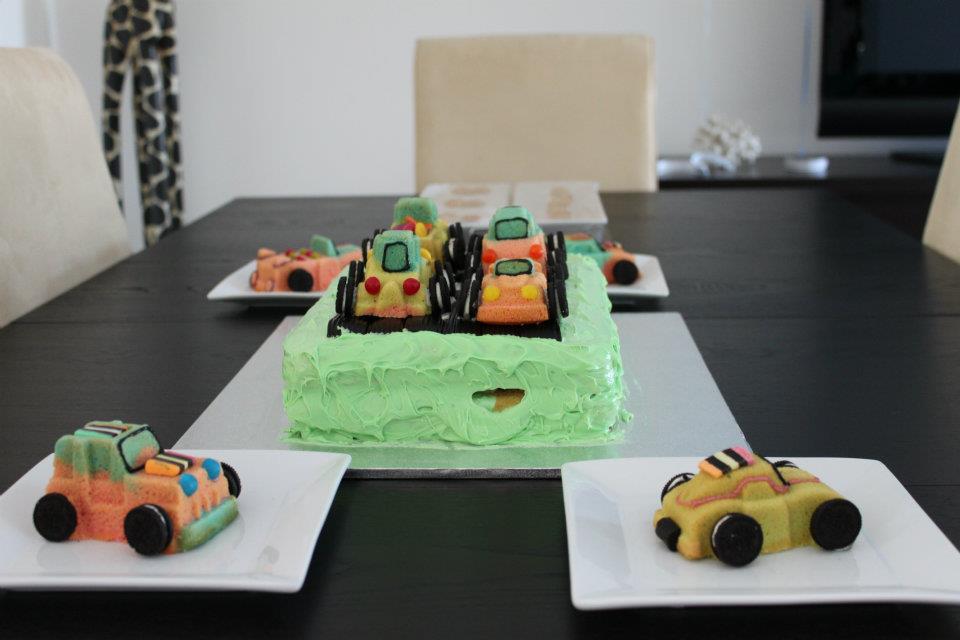

My toddler's birthday is coming up and in preparation I bought the nordic ware classic car cake pan, you can see it here.
It appears only a 'firm' cake will produce the fine detail of the cars so I went searching for the recommended recipe and found this one from here It has great detailed directions for a baking novice like me.
This was a success although not exactly a kid cake. The loved how it looked but not many ate the actual cake.
I separated the cake mixture into three bowls and added blue, red and green food colouring. Enough drops to make the mixture fairly bright (although slightly less on the red since I think it makes kids go crazy). I think this really added to the appeal of the cars and let me get away with less candy decorations.
Ingredients
A cake recipe from Nordic Ware that is suitable for most Nordic Ware standard 10 cup cake tins. Look underneath the rim to check the capacity of your tin.
Ingredients
•370g / 13oz butter, softened
•370g / 13oz caster sugar
•370g / 13oz plain flour
•2 tsp vanilla extract
•6 medium eggs (at room temperature)
•4fl oz / 110ml milk or plain yogurt (at room temperature)
Method
1. Preheat oven to 160°C / fan 130º / gas 3. Oven temperatures vary, so you'll need to experiment to get the perfect temperature. Don't be afraid to bring the cake out of the oven halfway through baking to check its progress.
2. Use a pastry brush to brush melted butter (not margarine) all over the interior. Make sure you butter all the corners and grooves of the pan. You can use a spray oil as an alternative too, and dust with flour if you wish depending on what type of cake you are making, but Nordicware says the best results are achieved with just butter.
3. Beat the butter and sugar with an electric whisk or in a food processor, until pale and creamy. Add the vanilla extract
4. Add the eggs one at a time with a tablespoon of the flour, beating until just combined after each addition.
5. Add the flour in two or three batches until well combined.
6. Add in the milk or yogurt while the electric whisk is in motion. The mixture should look like a fairly wet batter and easily drop off a spoon in folds.
7. To prevent air bubbles in the cake, slowly pour the cake mix into one corner of the pan and allow the mixture to ‘flow’ in and around the cake tin. Gently tap the filled cake tin on the work top for a while; this will make the air bubbles/pockets rise up and away from the outside of the cake, and allow the cake mix to settle into all the details - the mixture should fill the tin to about ¾ full.
8. Use a spatula to push the mixture up the sides of the pan, pushing up the walls to the top; this will help the cake ‘climb’ up the sides during cooking, giving you greater detail on the outside of the cake.
9. Tap the tin on the worktop to release as many air bubbles as possible. The longer you tap for the more air bubbles you’ll get out, and the better the detail you’ll achieve.
10. Place the pan on the centre shelf of the oven and bake for 40 – 50 mins or until a skewer poked into the middle of the cake comes out clean.
11. Cool in the tin for 10 minutes (no less, no longer). This will allow a moisture barrier to build up between the pan and the cake. Use oven gloves to pick up the cake pan and gently shake the pan from side to side listening for a ‘thud’. (This indicates the cake is loose and ready to invert.) If sticking persists around the edges a plastic knife may be used to carefully loosen the cake - NEVER use metal utensils in any non-stick cake tin or it will scratch!
12. Turn the cake out on to a plate or cooling rack and leave to cool. Dust with icing sugar using a sifter, drizzle your favourite sauce on top or use icing pens to highlight the detail and add decorations.
I decorated the cars with the following candy:
Fruit rolls ups
Licorice all sorts (cut in half width wise)
Jelly beans (just the tip cut off the end for head lights)
Mini oreos as wheels
Licorice straps as the road
I "glued" the candy on using gel icing pens in pink. (the lightest colour I could find)
I outlined the windows and license plates in gel black icing.
Other candy would work but some things that were too heavy, like M&Ms, kept falling off.

No comments:
Post a Comment